If you ever built your own Concrete5 theme you might have wondered why there are usually two css files – main.css and typography.css. In this tutorial I’ll show you some possibilities of typography.css. You should have basic knowledge about building a theme for Concrete5. Read this tutorial in case you never built one before: http://www.codeblog.ch/2009/01/concrete5-theme-erstellen/
Prequisites
In this tutorial I’m using a simple theme which you can find in the Concrete5 Marketplace, it’s called Dreamy and has been created by Scott.
I removed a few things in the theme which I don’t need to make it a bit easier to understand, but that’s not necessary.
The page design
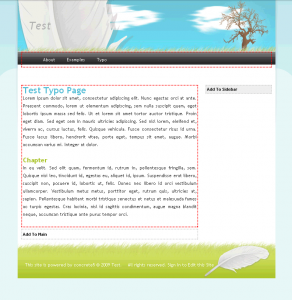
I created a simple text page using the modified theme which looks like this:
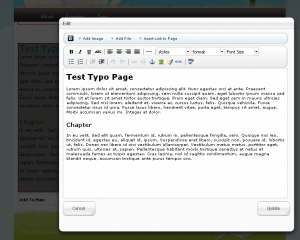
Please note that I’ve changed the colors of H1 and H2. When you now edit this page, the WYSIWYG editor TinyMCE looks like this:
The headings H1 and H2 are black. Wouldn’t it be nice if the user could see the typography there too? This is what typography.css is good for. Let us add a few lines to typography.css:
1 2 3 4 5 | .File { background:transparent url(images/file.gif) no-repeat scroll 5px 7px; display:block; padding-left:16px; } |
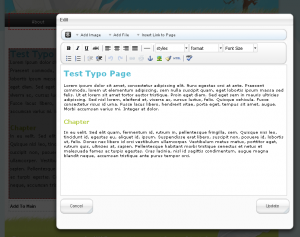
By default, the WYSIWYG editor looks for the file called typography.css and includes all the styles too. By doing this, it allows you to add styles which can be displayed during the editing of a text to give the user a first impression about the text layout.
If you edit a text after you’ve added the css rules, the editor will look like this:
You might have to clear your cache if you can’t see the changes! It’s also possible that you can’t see the styles because the typography.css isn’t where it’s supposed to be. It’s essential, that you place it in the root of your theme! For example: /themes/codeblog/typography.css and not /themes/codeblog/css/typography.css!


30 Comments
Thanks for writing this I knew there had to be an easy way to do this. The ability to add images/icons impressed me even more. This should help the client out very much.
Really Cool. Thanks for this, I was wondering how to get styles into the WYSIWYG editor that clients could use when updating content.
Thanks Again!
Thanks for the great tutorials. Im very new to Concrete 5 and am going through all thet basic stuff. I’d like to add more fonts to the Font family list in the “Office” WYSWIG editor that can be selected in the Sitewide settings on the C5 Dashboard. I’ve tried changing the topography.css and main.css for different themes to see if the changes are reflected. I also tried adding a new font the fonts list in the code for the Custom WYSWIG selection but the WYSWIG editor that comes up does not display the Font family class. Would appreciate your help.
This depends on the font you want to use. If you’re fine with system fonts like Arial or Times New Romand you can simply add a style like this:
.Arial {font-family: Arial}
If you need a not well known font, things are a bit different (more complicated). It’s not related to Concrete5 at all but you need to use some JavaScript or Flash Tools to include such fonts.
I wrote a (german) article about this a while ago: http://www.codeblog.ch/de/2009/04/schriften-im-internet-cufon/
Thanks Remo.
Which file do I need to add the style (eg. .Arial {font-family: Arial} ) to in order to see it in the font family dropdown list in the TinyMCE editor in the “Office” toolbar. Do I need to do this for each theme? Or change a css file in the core concrete5 directory? I tried adding a new system font family to topography.css and it still does not come up in the Tiny_MCE editor font list.
Also I read your article about integrating javascript fonts. The example you give shows an html file. In the C5 configuration, what file do I need to add this script to?
Cufon.replace(‘h1’)(‘h2’);
Thanks
This is actually not related to Concrete5 but rather TinyMCE. You need to use the custom toolbar (not office) and modify the configuration according to this site:
http://wiki.moxiecode.com/index.php/TinyMCE:Configuration/theme_advanced_fonts
About cufon – it doesn’t really matter. Whether you put it into the head or an external javascript, it works..
Hi Remo, Thanks for your fast reply.
I’ve worked it out now! I went to the TinyMCE website (http://tinymce.moxiecode.com/examples/full.php) and got the source code for the full featured editor and saw why I was missing the “font family” drop down in the custom toolbar. I then added “Lucida=lucida console” and “Century Gothic=century gothic” in the line for “theme_concrete_fonts” (in Dashboard/sitewide settings/content toolbars/custom) and can now see them in the list when I edit the content. Again thanks for your help.
Hi Remo
thanx for your great articles – just what I needed!
I’m trying to implement a custom font into a C5 site I’m building. I downloaded the Cufon-Script, and made a custom script using the generator (uploaded the TTF-files). So, I got those two files and the code I need to insert, but I’m still stuck at the same question dekelly asked: What file of my C5 installation do I have to insert the code into?
And, did I understand correctly, the tinyMCE solution only works with “standard” fonts? Or could I even implement my custom font (I got 4 TTF files, standard, bold, italic, italic bold) into the editor?
Thanx for your help.
Markus
You should read my article about building a theme to get used to the structure of a c5 theme. I’m sure this would be helpful to answer such questions on your own..
As I said it doesn’t matter where you insert the code, you can insert it into header.php but you could also include an external javascript file by adding a link tag in header.php… It works like any other javascript!
Kind of. You can only use the standard font if you want to use the “font drop down”. But you can of course replace the H1 tag which you’ve inserted using TinyMCE. You won’t see your custom font within TinyMCE but you’ll see it if you look at the generated output..
I would use custom css classes which I’d put into the “styles drop down”. Then modify the cufon script to replace those styles using your custom font. Not a perfect solution but you need to create your own TinyMCE plugin for anything better. It’s not difficult to do but still takes a few minutes, especially if you’re not very familiar with JavaScript…
Ciao Remo
Thanx for your quick answer. I’m reading the article you mentioned atm.
Still, the cufon-truc does not work .I inserted:
Cufon.replace(‘h1’)(‘h2’);
below the tag in header.php, as you said. The two .js files are in that folder, I checked that.
Then I added
Cufon.now();
right above in footer.php.
Yes, I am a n00b in c5/js, but as far as I understood it, that should do the trick – changing all the text (h1/h2) in between header.php and footer.php (thus everything on the site) to my custom font, called test_text.font.js. Not?
Still, nothing. The text on the entire site is still the same standard font – title, body, everthing.
What am I doing wrong?
thanx
Markus
Yep, this is how it should work and it works for me… What about a link to your site?
aargh, submitting tags in the comment is not allowed – all the tags got deleted from my comment above.
Anyhow, I’m stuck. Anybody feeling like doing a good deed today, feel free to help me on guedu50 at hotmail dot com. 🙂 German or English, or Spanish, or whatever…
greets
Markus
Hi Markus,
Here’s a link from Nettuts with an 11min screencast by Jeff Way.
http://net.tutsplus.com/videos/screencasts/the-easiest-way-to-use-any-font-you-wish/
He integrates it into a HTML doc.
It might give you some pointers. Im still in the middle of it…
Hi Remo,
Good article. I’m having a bit of trouble with the TinyMCE editor in a site I’m building because no styles aren’t appearing in the drop-down list for any of the Simple, Advanced and Office default configurations.
I’ve tried doing a custom config, but only one style appears in the drop-down (called ‘Note’, but I haven’t created a style called that).
My typography.css is in a folder in my theme called ‘css’ along with main.css and they’re referenced properly in my site because changes to them are reflected in the main site. My classes in typography.css don’t have any IDs before them i.e.
.classname {}
not
#main .classname {}
So I’m confused why they’re not appearing. Is there anything else I can check? There are no CSS errors in typography.css.
Thanks
osu
There are several reasons why styles don’t appear.
1. Simple class names. I think I had a problem when my classes had a long name including some underscores. Try using something very simple like “Test”
2. Don’t override content_css. This is the TinyMCE parameter used to include typography.css (http://wiki.moxiecode.com/index.php/TinyMCE:Configuration/content_css)
3. Check the generated initialize code which loads TinyMCE and check where content_css points to – does that file exist?
4. Cache. Try clearing your cache..
Hi Remo,
Thanks for getting back to me – in answer to your questions:
1. Simple class names.
Even with one class in there called .test {}, it still doesn’t work unfortunately
2. Don’t override content_css.
I haven’t done anything to override it as far as I know – not sure which file I would edit to do that either…
3. Check the generated initialize code which loads TinyMCE and check where content_css points to – does that file exist?
Where can I find that file please?
4. Cache. Try clearing your cache..
Tried that – I have Web Developer add-on installed for Firefox and have even disabled the cache to try this, but nothing…
I think point 3 might be my best bet based on the things I’ve tried..
Thanks
Hi Remo,
Any idea what I can try after these or where I can find that file (point 3 you mentioned)?
Thanks,
osu
Managed to find the problem – the typography.css (and I think all CSS) needs to be in your theme folder and not a subfolder of your theme folder (as was the case with me).
Thanks for your help,
osu
Hey Remo,
thx for sharing this!
Regards
Finally got around to reading this tutorial. Very helpful. Thanks.
Remo,
You tutorials have saved me a couple of times, Thanks!
I’m having trouble with my typography.css in that my styles are affecting how the native dialogue boxes of C5 appear. I want to use a H1 style that looks like this:
h1 {
font:bold 11px Verdana, Arial, Helvetica, sans-serif;
background:#000000;
text-transform:uppercase;
color:#ffffff;
padding:5px 0px 5px 15px;
margin:0px 0px 6px 0px;
}
I’ve tried wrapping my site in a #container id but either the style changes C5 dialogue boxes or doesn’t appear in the WYSIWYG editor.
Any thoughts? I was hoping on submitting this as a free theme to the market place.
Thanks Ryan! Not sure how this can be achieved right now. Did you post this at concrete5.org?
Remo,
Thanks for this. BTW: I haven’t seen nor heard from you on C5 for almost two months. The place isn’t the same without you. Hope you’re alright.
I liked very much the drop down auto-nav tutorial! Does anyone have code for the vertical accordion one? I figure that you need to add a float-left (or right), but I guess it need more than that… jquery added would be great
tks
bellir
On the menu question… I mean, I need a way to convert the drop_down auto-nav menu into a sidebar menu with accordion features.
tks
bellir
Hi there!
My only question is that is it possible to add an alternative class name for a class? In css class names we can’t use accentuated letters.
For example this is my class:
.fejlec {…}
And I’d like this appearing in Tinymce in the styles list like this:
Fejléc
Thx
I don’t think that’s possible due to a restriction of the CSS specification itself. There might be a workaround for something like this in TinyMCE but I haven’t found anything but if you want to be 100% sure you’d have to ask the people behind TinyMCE. TinyMCE is the HTML editor used in concrete5, almost everything that relates to TinyMCE applies to the concrete5 content block as well.
Hey Remo,
How do I get the Style drop down to work on a dashboard single page for a custom feature that I built? I have implemented the editor, but no idea on how to pull the typography from my theme into it.
BTW, I bought your book and I love it!
Thanks,
Andrew
Andrew, you could include them within the body but I recommend to do this in the controller of your single page. Add a method like this to include CSS and JavaScript files in the header.
Hallo Remo,
oh je, und ich hab mich immer gefragt, wofür denn die extra typography.css gut sein soll, wenn man doch alles in die main.css packen könnte. Danke für die Aufklärung!
Torsten