If you ever built a concrete5 package before, you’ll probably have had to write some code to handle the installation process where you check if an object is already installed and if not, add it. Especially with packages that are in use, this can take a while and the code gets messy very quickly. However, there’s an alternative which is not yet well known.
Creating installation XML
Before we start looking at some code, how do we get our XML content? There are a ton of different objects, but luckily, we can generate an XML from an existing site very easily. To do that, you’ll have to install the Sampel Content Generator you can find here http://www.concrete5.org/marketplace/addons/sample-content-generator/. Please note that you currently have to install it manually as it’s marked as incompatible with version 5.6.
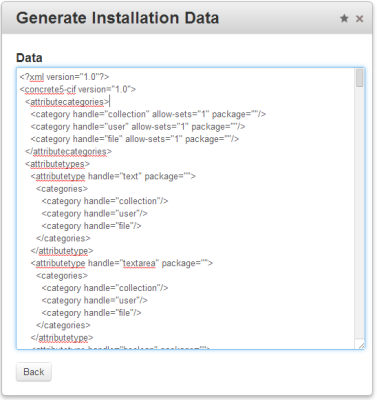
Once you’ve installed the add-on, you can find a new single page in your dashboard. If you open it, you’ll find two buttons, the first one “Archive Files” to create a complete zip file of the site and the second one “Generate content.xml from current website” to get the output we’re looking for. If you click on the second button, you’ll see a screen like this:
The output you can see in this screen contains everything you’ve got in your site. That’s way too much for a package but it’s pretty easy to find the elements you need. Most elements are pretty self-explanatory. In my example, I’ve needed two elements, one I had to add using a previous version of my package controller (attributetypes) and one I’ve added in the dashboard (attributetypes). The complete content of my XML looks like this:
1 2 3 4 5 6 7 8 9 10 11 12 13 | <?xml version="1.0"?> <concrete5-cif version="1.0"> <attributetypes> <attributetype handle="remo_phasher" package="remo_phasher"> <categories> <category handle="file"/> </categories> </attributetype> </attributetypes> <attributekeys> <attributekey handle="image_hash" name="Image Hash" package="" searchable="1" indexed="1" type="remo_phasher" category="file"/> </attributekeys> </concrete5-cif> |
I’ll put this content in a file called install.xml right in the root of the package. It looks like this:
Install XML content from package controller
In our package controller, all we need is this:
1 2 3 4 5 6 7 8 9 10 11 12 13 14 15 16 17 18 19 20 21 22 23 24 25 26 27 28 29 30 31 32 33 | <?php defined('C5_EXECUTE') or die('Access Denied.'); class RemoPhasherPackage extends Package { protected $pkgHandle = 'remo_phasher'; protected $appVersionRequired = '5.6.2.1'; protected $pkgVersion = '0.9'; public function getPackageDescription() { return t("Adds perceptual hash to images."); } public function getPackageName() { return t("Image pHasher"); } public function install() { $pkg = parent::install(); $ci = new ContentImporter(); $ci->importContentFile($pkg->getPackagePath() . '/install.xml'); } public function upgrade() { $pkg = Package::getByHandle($this->pkgHandle); $ci = new ContentImporter(); $ci->importContentFile($pkg->getPackagePath() . '/install.xml'); parent::upgrade(); } } |
We simply get an instance of ContentImporter and import the content of our XML file in both methods, install as well as upgrade. If you need a new item, just add it to install.xml and you’re good to go. You can find a complete example on github: https://github.com/Remo/concrete5-phasher.


