(English) Book Review – Learning FuelPHP for Effective PHP Development
- 04.12.2013
- FuelPHP, PHP
- 1 comentario

I’ve been playing around with FuelPHP for a while and despite the fact that I haven’t used it in production, it has been on my watch list ever since I first saw it. When I saw the new book about FuelPHP by Ross Tweedie, I was eager to read it – here’s my feedback about. If you just want to buy the book, you can get it at Amazon or directly from Packt Publishing.
About the book
The book has about 80 pages of actual content and covers these topics:
- Chapter 1 – A few words about the history, some ideas behind FuelPHP and a good bit of theory.
- Chapter 2 – Installation using the console script and a few words about alternative methods like GIT.
- Chapter 3 – You’ll find information about the architecture in this chapter, (H)MVC, Configurations etc.
- Chapter 4 – Shows you how to create models, controllers to build a simple blog application.
- Chapter 5 – A list of packages you can find in the internet as well as a quick introduction showing you how to create your own package.
- Chapter 6 – A few advanced topics like unit testing, routing concepts, custom oil (the FuelPHP console tool) tasks and profiling.
- Chapter 7 – briefly covers the FuelPHP community and where to find more information about FuelPHP if you need it.
Targeted Audience
Without having read who the author actually targets, to me it feels like you’ll have to know quite a bit of PHP and some of the tools you use when writing software. At the beginning, you’ll have a nice overview where you can get a good understanding for FuelPHP and why yet another framework does make sense. The author also starts to use some words like closures, singletons, multitons pretty quickly. There are a few words explaining it, but I don’t feel I’d have actually understood it, if I haven’t worked with these things before. Not every person learns the same way, but I’d have liked to see a few links where I could actually see some example code of a multiton pattern.
Not the fault of the author, but software changes and usually much quicker than paper does. The book seems to have used version 1.6 as well as 1.7 when writing his book. I started straight with the current version which is currently 1.7.1. The good news, it will work just fine, even if the book is focused on 1.6. Not related to the book but more about FuelPHP, version 2.0 has been announced a while ago. The author also covers some changes we’ll see and that’s a bit of a downside to me. I do like everything that will change, but it makes me want to skip the 1.x version.
The bad sides
The author seems to be a skilled developer and likes to write software. I believe that, because I see some similarities with my own behaviour. The book covers quite a few things, things like GIT which are great (imho), but the explanation will hardly be good enough for someone who hasn’t worked with it before. I’d have recommended to keep that part in a blog and simply link to it. As soon as you run into an issue with GIT, you’re on your own. Although, I tried to go through the book without setting up a repository and it worked fine.
There are other situations, for example in the installation where the required PHP modules are described, but not with a name you can use to find the actual PHP extension you’ll need. Luckily that shouldn’t be an issue since FuelPHP doesn’t require much.
While FuelPHP works on different webservers like Apache, Nginx, IIS and probably a few more, most of the book is focused on Apache and *nix. There are a few shell commands that you won’t be able to run on a Windows computer, at least if you don’t want to play around with Cygwin or something similar.
Here’s a list which I think should be improved if there’s going to a be a second edition:
- What the heck is a “Temporal ORM”? I do know quite a bit about SQL, ORM but was surprised to see a term right at the beginning of a book which is completely new to me. Luckily for me, Google also has only 36 results about this expresison
- There are some magic commands in the book. While I understand their benefit, I’d recommend to leave them out and focus on the actual FuelPHP part. An information box with a sentence or two and a link would have been sufficient.
- Probably something the publisher should improve. Just like my books, the code formatting could be better – I’ve seen worse but perfectly indented code is nice! I’d also recommend to highlight the line that actually matters.
- I was sometimes confused about instructions, they were in the middle of a step by step procedure but sounded quite theoretical.
- Make sure things are complete, when writing that you simply have to add a package to composer.json to install a new module, that’s incorrect, you’ll have to run composer update too. These things are small, but details matter, especially to beginners
You’ll find a few more situations, but after all I like the book and don’t want to give you an impression that’s worse than I think it should be.
The good parts
I like the started, the introduction about FuelPHP. I often ask myself: Do we really need this? Whether it is a PHP framework, a new Linux desktop. You’ll get a good feeling about what FuelPHP is about.
The demo application is perfect, it shows you how to create models in no time, how to run migration scripts to manage the creation but also the change of the database structure. It quickly covers the controller part, a few words about models and their relationships and bit about the output. You’ll also learn how to create a module and a package, their difference is well explained but will change in v2.0 as far as I know.
Should I read this book?
It depends on your background – I wouldn’t recommend it if you’re a PHP programmer who hasn’t worked with namespaces, databases before. But please keep in mind that this is a short book of only about 80 pages content. FuelPHP might have deserved a bit more but the shortness was nice – at least for someone like me who has worked with all kinds of frameworks. I’d definitely recommend to book if you worked with other frameworks like CodeIgniter, Yii, Zend .. before and now want to have a look at FuelPHP. You’ll get a good impression about its possibilities!
Linux Terminal im Web
- 28.02.2010
- Linux
- 5 comentarios
Als *unix Administrator wird man SSH wohl kennen und lieben. Auch wenn man mit einem Windows Computer arbeiten muss, kann mit Tools wie Putty sehr einfach auf dem Linux Server gearbeitet werden. Es gibt allerdings Situationen wo auch das nicht funktioniert, weil das Netzwerk ausgehenden SSH Traffic nicht zulässt. Dies ist auch verständlich, könnte man mit SSH doch sehr einfach einen verschlüsselten Tunnel aufbauen und geheime Konten-Informationen klauen.
Es gibt jedoch einen Weg, mit dem man trotzdem auf den Linux Server zugreifen kann, ohne dabei die Möglichkeit zu haben, einen Tunnel zu erstellen. Das Tool das man dazu benötigt findet sich auf Google Code und nennt sich shellinabox.
Leute die wie ich mit Debian arbeiten, haben es besonders einfach:
wget http://shellinabox.googlecode.com/files/shellinabox_2.10-1_i386.deb

dpkg -i shellinabox_2.10-1_i386.deb
Damit wird automatisch eine Init Script erstellt welches man hier findet: /etc/init.d/shellinabox. Wurde dieses ausgeführt, lässt sich die Linux Shell via Browser hier erreichen: https://localhost:4200. Da allerdings auch der Port 4200 wohl meistens geblockt wird, wollen wir den Verkehr von HTTPS zu 4200 umleiten, indem wir mit Apache einen Reverse Proxy einrichten. Als erstes müssen wir sicherstellen, dass beim Apache die entsprechenden Module aktiv sind:
/etc/apache2/mods-enabled

ln -s ../mods-available/proxy.conf

ln -s ../mods-available/proxy.load

ln -s ../mods-available/proxy_http.load
Anschliessend die gewünschte Apache Seiten Konfiguration anpassen. In meinem Fall hab ich in /etc/apache2/sites-available/default-ssl die folgenden Zeilen eingefügt:
<Location /shell>

ProxyPass	http://localhost:4200/

Order 	allow,deny

Allow	from all

</Location>
Shellinabox arbeitet standardmässig mit HTTPS und kann von jeder IP Adresse angesprochen werden. Auch das ändern wir, indem wir in /etc/init.d/shellinabox SHELLINABOX_ARGS hinzufügen (nur die letzte Zeile in der folgenden Box):
# Set some default values

SHELLINABOX_DATADIR="${SHELLINABOX_DATADIR:-/var/lib/shellinabox}"

SHELLINABOX_PORT="${SHELLINABOX_PORT:-4200}"

SHELLINABOX_USER="${SHELLINABOX_USER:-shellinabox}"

SHELLINABOX_GROUP="${SHELLINABOX_GROUP:-shellinabox}"

SHELLINABOX_ARGS="--localhost-only --disable-ssl"
Nun alle Dienste neu starten: “/etc/init.d/shellinabox restart” und /etc/init.d/apache2 restart” – schon lässt sich die Shell via https://localhost/shell erreichen!
Angepasste 404 Seite mit Concrete5
- 18.01.2010
- Concrete5, PHP
- 14 comentarios
Es sollte nicht oft vorkommen, aber manchmal landen Internetseiten Besucher auf einer nicht vorhandenen Seite. Oft wird dann eine simple Seite angezeigt mit dem Hinweis dass die Seite nicht verfügbar ist. Etwas mehr Informationen können da hilfreich sein. Besonders wenn eine Seite einem kompletten Redesign unterzogen wurde, kommt es vor, dass Google Besucher auf nicht vorhandene Seiten schickt. In diesem Tutorial geht es um die Anpassung der “Standard 404-Seite”.
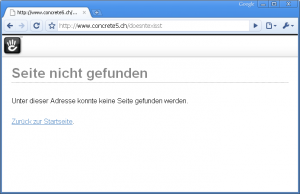
Concrete5 erlaubt es, ohne grossen Aufwand die 404-Seite anzupassen. Allerdings gibt es ein paar Dinge die man kennen muss. Als Ausgangslage dient diese Seite – die Standard Concrete5 404-Seite:
Bilder in der Navigation
- 14.12.2009
- Concrete5, PHP
- 63 comentarios
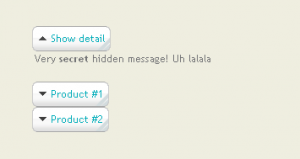
Concrete5 Navigation mit Bildern – der autonav Block erlaubt es sehr einfach und schnell eine hierarchische Seitenstruktur zur Navigation einzufügen. Sollen jedoch nicht Text-Links, sondern Bilder angeklickt werden, braucht es etwas mehr Arbeit.
In diesem Tutorial werde ich ein “Custom Template” für den autonav Block erstellen, welches ein Attribut von einer Seite ausliest um ein Bild anstelle des Textes anzuzeigen.
Concrete5 – Form styling
- 14.07.2009
- Concrete5, PHP
- 48 comentarios
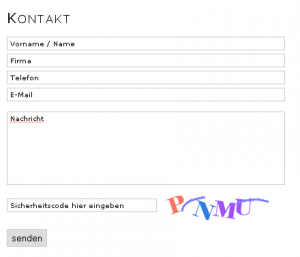
Concrete5 bietet einen netten Form Block, mit dem man Formulare in wenigen Sekunden erstellen. Dies ohne HTML oder PHP Kenntnisse. Unglücklicherweise lässt sich der HTML Code davon, nur schlecht mit CSS anpassen. In diesem Tutorial zeige ich, wie man ein Formular in diesem Stil erstellen kann:
Vorschau Text mit PHP
- 20.06.2009
- PHP, Uncategorized
- 4 comentarios
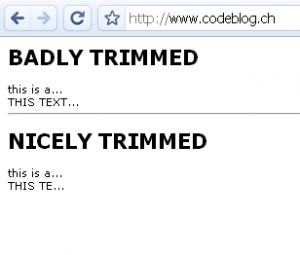
Möchte man einen kurzen Vorschautext in PHP erstellen, der einen Anriss des effektiven Textes zeigt, so wird man wohl oft die einfachste Variante gewählt haben, und einfach nach einer Anzahl definierten Zeichen abgeschnitten haben. Dies generiert jedoch ein unschönes Ergebnis, wenn man eine proportionale Schrift verwendet. Sämtliche Text haben markant unterschiedliche Längen wie auf diesem Bild gezeigt wird:
Dieser Artikel zeigt einen einfachen Ansatz, diese Problematik etwas eleganter zu lösen!


