Concrete5 (35)


Getting started with Google App Engine for PHP and concrete5

You might have read or heard that Google added PHP as a supported language to their cloud hosting platform App Engine. The official documentation is available here and gives you a lot of information to get started:
https://developers.google.com/appengine/docs/php/gettingstarted/.

If you’re a returning visitors to this blog, you’ll probably have noticed that I often work with a CMS called concrete5. It’s a neat CMS to work with for end users but also very powerful to extend for developers.

No surprise, I wanted to see if I could get concrete5 running on GAE for PHP. The documentation has clear instructions that help you to get a test environment ready on your local computer. You’ll need to install Python, PHP as well as the Google App Engine SDK for PHP, more about that here: https://developers.google.com/appengine/docs/php/gettingstarted/installing.

The Hello world tutorial explains almost everything you need to know to get concrete5 running, I’d recommend that you follow it too, it only takes you a few minutes to install everything and get the famous “hello world” output on your screen https://developers.google.com/appengine/docs/php/gettingstarted/helloworld. As you can see in this tutorial, Google doesn’t use a htaccess file but rather a file called app.yaml. This is where you specify your applications settings as well as redirect rules. The most important part is this:

- url: /.*
  script: index.php

This will tell App Engine to redirect all requests to index.php which is exactly what concrete5 does too, but normally using this:

RewriteRule . index.php [L]

However, there’s one more thing we have to take care of, there are static files that won’t be served correctly at the moment. Let’s have a look at the original .htaccess file first:

<IfModule mod_rewrite.c>
RewriteEngine On
RewriteBase /
RewriteCond %{REQUEST_FILENAME} !-f
RewriteCond %{REQUEST_FILENAME}/index.html !-f
RewriteCond %{REQUEST_FILENAME}/index.php !-f
RewriteRule . index.php [L]
</IfModule>

Let’s just focus on the first RewriteCond, this will make sure that the RewriteRule statement is only executed if the requested file doesn’t exist. If /concrete/themes/default/main.css is requested, Apache will know that it exists as a real file and stops the rewrites process, but if /about is requested, Apache will forward that request to index.php. I couldn’t find the exact same functionality but with an additional handler, I was able to see resources like the pictures just fine. Here’s the complete content of app.yaml:

application: concrete5
version: 1
runtime: php
api_version: 1

handlers:
- url: /(.*\.(ico$|jpg$|png$|gif$|css$|js$))
  static_files: \1
  application_readable: true
- url: /.*
  script: index.php

When working on your local computer, you can easily use your existing MySQL installation but if you want to deploy your application to the cloud, things work a bit different. Unfortunately I wasn’t aware of that, I thought that if I only use very little resources, App Engine would be free. From what I can tell, you can run a PHP application for free but as soon as you want to store something in a database, you have to pay. There are two different options, first Google Cloud Storage which is a simple database without a lot of functionality, if you want to port an existing SQL based application, you might want to look at Google Cloud SQL which is a MySQL database running in the cloud. More about that here https://cloud.google.com/products/cloud-sql. Here are a few technical things that you might want to check out https://developers.google.com/appengine/docs/php/cloud-sql/developers-guide.

Since I wanted to move my concrete5 site concrete5.ch to Google App Engine, the fact that storage isn’t free, is a killer argument at the moment. I’d very much like to finish the experiment but I’ll wait till I have a project where I actually make some money before I spend money.

However, I’m pretty confident that I could get concrete5 running on App Engine.


concrete5 pages with .html extension in URL

This article might be very specific for one issue and also a bit hacky, but something when you care about your search engine ranking a lot, it might be good idea to look at it.
If you move an existing site to concrete5 which was in the internet for a while, you’ll have a number of websites that point to your site. Depending on the old CMS, if there was one, the URLs might look different than common concrete5 URLs. What choices do you have in such a situation?

  1. Do nothing and wait till Google updates its index, but keep in mind that other websites might never update their links unless someone tells them to do so.
  2. Add a proper 301 redirect that forwards the visitors to the new page. There’s an add-on for this written by ScottC that handles this task very nicely, http://www.concrete5.org/marketplace/addons/url-director/
  3. Make sure the old links still work but changing the concrete5 URLs

In this article we’re going to look at the last option. Before we start, you should know how a page path in concrete5 looks like. You probably do but just in case:

  • /about/
  • /help/faq/

Sometimes the trailing slash is missing but that doesn’t matter in our case. Let’s assume we’ve got an existing non-concrete5 site where the page paths look like this:

  • /about.html
  • /help/faq.html

We’re going to make a few minor changes to make it possible to use this addresses without having to add a redirect. Google nor any visitor will see a change unless they look at the source code of the website.
To achieve this, we need to modify the .htaccess file. If you aren’t familiar with it, in short: It’s an Apache specific file that lets you add certain configurations without having to touch the central configuration file. Before you continue, make sure you’ve got pretty URLs activated, to do this, type “pretty urls” in the intelligent search box in concrete5 and tick the checkbox. If everything works, this change should work as well.

Open the .htaccess file, it might be hidden depending on your FTP client, make sure you’ve enabled to option to see hidden files, and make it look like this:

RewriteEngine On
RewriteBase /
 
RewriteCond %{REQUEST_FILENAME} !-f
RewriteCond %{REQUEST_FILENAME}/index.html !-f
RewriteCond %{REQUEST_FILENAME}/index.php !-f
RewriteRule (.*)\.html$ index.php [E=HTML_URL:/$1/]
 
RewriteCond %{REQUEST_FILENAME} !-f
RewriteCond %{REQUEST_FILENAME}/index.html !-f
RewriteCond %{REQUEST_FILENAME}/index.php !-f
RewriteRule . index.php [L]

The interesting part is the first RewriteRule. It tries to match every request where there’s a “.html” at the end. If it found one, it will extract everything before the “.html”. The “.*” is the rule that matches everything and the brackets around it, make sure it gets saved as a variable, $1 in our case. The E=HTML_URL creates a new variable called REDIRECT_HTML_URL with the value of our path. The first part REDIRECT_ is always added by Apache.

Now that we have an additional variable that hols the correct page path in case there’s a URL ending with “.html”, we have to tell concrete5 to process that new variable. To do this, open config/site.php and insert a new line which defines SERVER_PATH_VARIABLE. Here’s a complete example but note that most values are probably different on your server, it’s just about the last line:

<?php 
define('DB_SERVER', 'localhost');
define('DB_USERNAME', 'codeblog');
define('DB_PASSWORD', 'sdf.sdfDD*çsdf');
define('DB_DATABASE', 'codeblog');
define('BASE_URL', 'http://www.codeblog.ch');
define('DIR_REL', '');
define('PASSWORD_SALT', 'yc8tSlHjZaGpADJ');
define('SERVER_PATH_VARIABLE', 'REDIRECT_HTML_URL');

That’s all it takes, after you’ve made these changes, you can go on an use .html at the end of your URLs.

How that’s it work?

Just for those who’d like to understand why this works. First we’ve made sure there’s a variable that holds the correct path, even if there’s a different ending. We then changed the variable concrete5 uses to find the correct page. If you open /core/concrete/libraries/request.php you can find this code:

public static function get() {
    static $req;
    if (!isset($req) || C5_ENVIRONMENT_ONLY) {
        $path = false;
        if (defined('SERVER_PATH_VARIABLE')) {
            $path = Request::parsePathFromRequest(SERVER_PATH_VARIABLE);
        }
        if (!$path) {
            $path = Request::parsePathFromRequest('PATH_INFO');
        }
        if (!$path) {
            $path = Request::parsePathFromRequest('REDIRECT_URL');
        }
        if (!$path) {
            $path = Request::parsePathFromRequest('REQUEST_URI');
        }
        if (!$path) {
            $path = Request::parsePathFromRequest('ORIG_PATH_INFO');
        }
        if (!$path) {
            $path = Request::parsePathFromRequest('SCRIPT_NAME');
        }
        $req = new Request($path);
    }
    return $req;
}

There’s a check which looks for SERVER_PATH_VARIABLE which is exactly what we’re using. Since concrete5 checks a few more things, we can still use the original page paths like /about.

Generate different URLs in concrete5

Now that we can process requests ending with .html you might wonder what we can do to create such addresses. This requires a bit more hacking but it’s also possible. In most cases where you have a link, concrete5 uses a helper called “Navigation”, here’s the official documentation about it: http://www.concrete5.org/documentation/developers/helpers/navigation/. We can override this helper and add “.html” to the links generated by it.

Create a new file called “navigation.php” in the root directory “helpers”. On a default installation, this directory will be empty. Once you’ve created that file, insert this content:

<?php
defined('C5_EXECUTE') or die('Access Denied.');
class NavigationHelper extends Concrete5_Helper_Navigation {
    public function getLinkToCollection(&$cObj, $appendBaseURL = false, $ignoreUrlRewriting = false) {
        $link = parent::getLinkToCollection($cObj, $appendBaseURL, $ignoreUrlRewriting);
        if (URL_REWRITING && !$ignoreUrlRewriting) {
            $relativeLink = rtrim(str_replace(BASE_URL, '', $link), '/');
            if ($relativeLink != '') {
                $link = rtrim($link, '/') . '.html';
            }
        }
        return $link;
    }
}

This hacky code will change your URLs and thus make sure you’ll have .html in your internal links.

As mentioned at the beginning, this solution is pretty hacky but might work in case you must keep the existing URLs. Let me know if there are things that I’ve missed.


concrete5 beginner’s guide 2nd edition

I’m happy to announce that the second edition of my concrete5 beginner’s guide is available. You can get your copy from Amazon or Packt Publishing.

The book has been updated to match the current version 5.6.1 and thus assures a better experience when following the examples. There was also a lot of valued feedback from new reviewers that has been incorporated in this edition. Thanks a lot to you guys, your feedback was very much appreciated!

Please keep in mind that this is a second edition, not a different book. If you read the first edition and managed to update your knowledge to the latest concrete5 version, there’s not much you’ll learn. The book is mostly aimed at people who want to get started with concrete5 and hesitated to buy the book because it’s a bit out-dated by now.

If there’s anything you’re missing, let me know about it – I’d be happy to publish articles on this blog to fill the gaps which were missed in the book!


concrete5 sitemap like autonav block

A lot of sites have a sitemap page where you can get an overview of all the available content on a site very quickly. However, when this list gets longer, you might want to use some JavaScript to add a tree like structure you can expand and collapse. In this tutorial we’re going to look at the process of building such an autonav block template.

There are plenty of jQuery plugins for this job around as well, but this time we’re going to create everything from scratch. Thanks to jQuery, this is going to take neither a lot of time nor lot of lines of code.
To keep the example as simple as possible, we’re not using any pictures at all. You can surely find a way to improve the layout once you’ve had a closer look at the jQuery code.

Building the Tree Navigation

  1. Create another directory structure for our template blocks/autonav/templates/tree.
  2. Within that directory create view.php, but this time we’ll use a different approach. We only want to change the class name to keep the functionality separated from other autonav blocks on the same page. We also don’t want to copy the default autonav block template to avoid redundant code. We’re going to replace the ul class name on-the-fly:
    <?php 
    $bvt = new BlockViewTemplate($b); 
    $bvt->setBlockCustomTemplate(false);
     
    function nav_tree_callback($buffer) {
    	return str_replace('<ul class="nav">','<ul class="nav-tree">',$buffer);
    }
     
    ob_start("nav_tree_callback");
    include($bvt->getTemplate());
    ob_end_flush();
    ?>
  3. In another file called view.css, you have to place some layout instructions for our tree. The script works without this, but the tree would look a bit misaligned:
    .nav-tree li { list-style-type: none; }
    .nav-tree { margin: 0px; padding: 0px; }
    .nav-tree ul { margin: 0px; padding: 0px 0px 0px 20px; }
    .nav-tree .tree-item-folder { cursor:pointer; }
    .nav-tree .tree-item-type { display:inline-block; width: 10px; }
  4. And finally some jQuery magic in view.js:
    $(document).ready(function() {
      // prepend a span element in front of each link
      $(".nav-tree a").parent().prepend("<span class=
        \"tree-item-type\"></span> ");
     
      // those span element being part of a parent element get a "+"
      $(".nav-tree ul:has(*)").parent().find("> .tree-item-type")
        .text("+").toggleClass("tree-item-folder");
     
      // hide all submenus
      $(".nav-tree ul").hide();
     
      $(".tree-item-folder").click(function() {
        $(this).next().next().slideToggle("fast"); 
      })
    });

Adding tree navigation

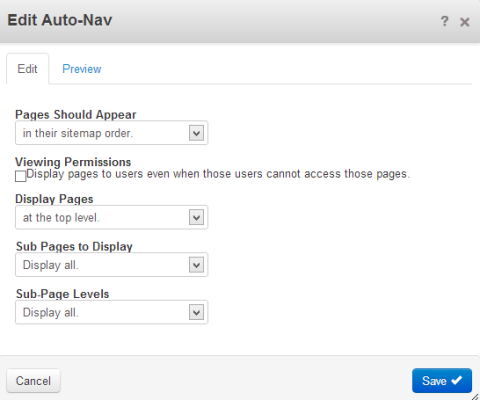
Now that we’ve created the template, we have to use it. To do this, edit the page where you’d like to insert the sitemap / tree. Insert a new autonav block with the following properties:
treemenuautonav

Click on the block after you’ve inserted it and select Custom Template and select the Tree template. Confirm the change and reload the page.

What just happened?

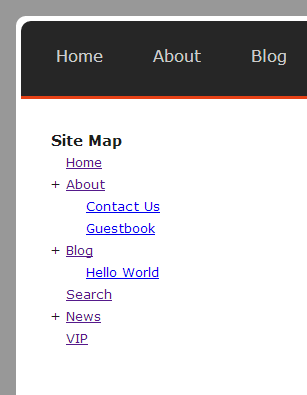
After you’ve created the template and assigned it to your autonav block you’ll have a tree-like navigation which looks as follows:
treemenu

This is another template which doesn’t use any external jQuery libraries at all. Thanks to jQuery, we only needed a few magic lines of code to add a small “plus” sign in front of all pages with subpages. It uses three lines of code to hide the subpages when the user clicks on the “plus” sign, and a small PHP template which includes the default template but replaces the ID to avoid any complications with other navigation blocks on the same page.


concrete5 database list and pagination

If you ever worked with tables in a web application, you’ll probably have had to build some kind of pagination. If you only have very few entries, that’s not necessary but if your database grows, you’ll probably need to display the data in pages of 20 items. In this tutorial, which is aimed at developers knowing concrete5, I’ll show you the use of a helper in concrete5 that does a nice job and helps you a lot in a way you’ll always add a pagination, even if you think you’ll only have 10 entries in the table.

This article contains quite a bit of here, let’s start with an overview of all the elements we’re going to build first:

  • A new package which holds all elements together
  • A “single page” to show you the use of our database item list class
  • Two models, one to manage our data and one which builds a list of it

More about the break!


concrete5 Themes Book

It’s been quiet on CodeBlog.ch but I wasn’t taking a break from writing, I just spent my writing time on a new book.
You can already order it on amazon http://amzn.to/159G3cG or directly from the publisher: http://www.packtpub.com/creating-concrete5-themes/book.

creating concrete5 themes

The book focuses on concrete5 themes. It’s assumed that you have some experience with HTML and CSS and also know how to read PHP code. Some programmierung experience is recommended!

You’ll be guided through the book by the following sequence:

  • Installation and usage of concrete5 – a few words about the installation as well as the basics to know if you want to work with concrete5 as an end-user
  • A quick look at the architecture of concrete5 – a first glimpse under the hood of concrete5
  • creating themes – the main part
  • Customizing block layouts – a few examples showing you how to change the look of the blocks to get more out of your concrete5 site
  • A small chapter explaining how to change the look for single pages – the 404 or login page among others
  • A short introduction into responsive layouts and how you can use these techniques in concrete5

I hope you’ll find it useful and will build lots of great sites with concrete5!


Share content across site in concrete5

If you worked with concrete5 before you probably know that there’s an in-site editing system where you can place a different kinds of blocks in areas. Usually a page has several areas and your site probably has several pages. This concept might have been a bit uncommon but once you’re used to it, it’s rather powerful and easy to understand as it allows you to edit your site in a layout more or less identical to the layout the site has to visitors.

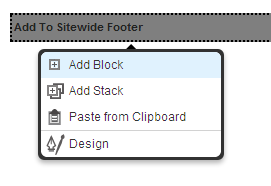
Placing content in a block works fine but if you wanted to have the same content on several pages it’s going to be a bit tricky. Assume you want to put a certain content in the footer of every page. There used to be a feature called “Scrapbook” which has been replaced by “Stacks”. You can find more information about this on the following page: http://www.concrete5.org/documentation/how-tos/developers/concrete5-5.5-stacks-vs.-scrapbooks/. This is one option you can use, but there’s another one where you can stay on the page you’re editing while amending sitewide content (when editing a “Stack” you’re being redirected to a dashboard page).


concrete5 – Custom Toolbar Button

with concrete5 you usually put your add-on code in a package and don’t touch the core. This concept allows you to update the CMS core without overriding anything you’ve built on your own. In order to interact with the CMS you can use several functions helping you to integrate your add-on into the CMS interface.

In this short article we’re going to look at a simple example which will place a button next to the edit button and shows a dialog with a quote. Nothing fancy, just an example aimed at developers who want to use this feature in their add-ons.

This is how your button is going to look like:


concrete5 SooperFish drop down navigation

Creating a drop down navigation is an old technique by now but it’s still used in a lot of cases to hide parts of a navigation. In addition to the plain CSS menu I wrote more than 2 years ago, I decided to write a new tutorial which uses JavaScript as well. You might ask why: Avoiding JavaScript is nice but creating something as complex as a drop down navigation without any JavaScript leads to a few ugly work arounds. You’ll also have some difficulties to add a fade out and fade in effect unless you’re using CSS3 which isn’t well supported yet.

But at the end it’s up to you, both solutions can work just fine!

Using SooperFish is also a bit easier for us, you’ll see at the end of the tutorial how little code you needed.
At the end your navigation can look like this:


concrete5 – improving performance by adding favicon.ico

Most browsers are looking for that little favicon to display a 16×16 icon next to the URL in the address bar. How does this work? There are two main ways:

  • They check if a file is available at /favicon.ico
  • They check if a proper link tag has been set:<link rel="shortcut icon"
    href="http://www.oraclerecipes.com/oraclerecipesicon.ico" />

But what happens if you don’t do anything of the above? The browser will still try to search for favicon.ico. While you don’t even see that when you open your browsers console, the webserver will notice that. If you check your webservers log file, you’ll find something like this:

www.oraclerecipes.com 88.222.33.111 - - [04/Sep/2011:08:09:23 +0200] "GET /favicon.ico HTTP/1.1" 404 751 "-" "Mozilla/5.0 (Windows NT 6.1; WOW64) AppleWebKit/535.1 (KHTML, like Gecko) Chrome/13.0.782.220 Safari/535.1"

The concrete5 URL rewriting rules check if the requested path is a static file but since it doesn’t exist, the request is forwarded to the dispatcher. This means that concrete5 will search through its database to see if there’s a concrete5 page available at /favicon.ico but obviously won’t return anything else but “Page not found”. This database lookup can easily consume 100ms which isn’t a lot but assuming you’ve got a busy site, this is probably still something you’d like to get rid!