Blog


Book Review – Learning FuelPHP for Effective PHP Development

I’ve been playing around with FuelPHP for a while and despite the fact that I haven’t used it in production, it has been on my watch list ever since I first saw it. When I saw the new book about FuelPHP by Ross Tweedie, I was eager to read it – here’s my feedback about. If you just want to buy the book, you can get it at Amazon or directly from Packt Publishing.

About the book

The book has about 80 pages of actual content and covers these topics:

  • Chapter 1 – A few words about the history, some ideas behind FuelPHP and a good bit of theory.
  • Chapter 2 – Installation using the console script and a few words about alternative methods like GIT.
  • Chapter 3 – You’ll find information about the architecture in this chapter, (H)MVC, Configurations etc.
  • Chapter 4 – Shows you how to create models, controllers to build a simple blog application.
  • Chapter 5 – A list of packages you can find in the internet as well as a quick introduction showing you how to create your own package.
  • Chapter 6 – A few advanced topics like unit testing, routing concepts, custom oil (the FuelPHP console tool) tasks and profiling.
  • Chapter 7 – briefly covers the FuelPHP community and where to find more information about FuelPHP if you need it.

Targeted Audience

Without having read who the author actually targets, to me it feels like you’ll have to know quite a bit of PHP and some of the tools you use when writing software. At the beginning, you’ll have a nice overview where you can get a good understanding for FuelPHP and why yet another framework does make sense. The author also starts to use some words like closures, singletons, multitons pretty quickly. There are a few words explaining it, but I don’t feel I’d have actually understood it, if I haven’t worked with these things before. Not every person learns the same way, but I’d have liked to see a few links where I could actually see some example code of a multiton pattern.

Not the fault of the author, but software changes and usually much quicker than paper does. The book seems to have used version 1.6 as well as 1.7 when writing his book. I started straight with the current version which is currently 1.7.1. The good news, it will work just fine, even if the book is focused on 1.6. Not related to the book but more about FuelPHP, version 2.0 has been announced a while ago. The author also covers some changes we’ll see and that’s a bit of a downside to me. I do like everything that will change, but it makes me want to skip the 1.x version.

The bad sides

The author seems to be a skilled developer and likes to write software. I believe that, because I see some similarities with my own behaviour. The book covers quite a few things, things like GIT which are great (imho), but the explanation will hardly be good enough for someone who hasn’t worked with it before. I’d have recommended to keep that part in a blog and simply link to it. As soon as you run into an issue with GIT, you’re on your own. Although, I tried to go through the book without setting up a repository and it worked fine.

There are other situations, for example in the installation where the required PHP modules are described, but not with a name you can use to find the actual PHP extension you’ll need. Luckily that shouldn’t be an issue since FuelPHP doesn’t require much.

While FuelPHP works on different webservers like Apache, Nginx, IIS and probably a few more, most of the book is focused on Apache and *nix. There are a few shell commands that you won’t be able to run on a Windows computer, at least if you don’t want to play around with Cygwin or something similar.

Here’s a list which I think should be improved if there’s going to a be a second edition:

  • What the heck is a “Temporal ORM”? I do know quite a bit about SQL, ORM but was surprised to see a term right at the beginning of a book which is completely new to me. Luckily for me, Google also has only 36 results about this expresison
  • There are some magic commands in the book. While I understand their benefit, I’d recommend to leave them out and focus on the actual FuelPHP part. An information box with a sentence or two and a link would have been sufficient.
  • Probably something the publisher should improve. Just like my books, the code formatting could be better – I’ve seen worse but perfectly indented code is nice! I’d also recommend to highlight the line that actually matters.
  • I was sometimes confused about instructions, they were in the middle of a step by step procedure but sounded quite theoretical.
  • Make sure things are complete, when writing that you simply have to add a package to composer.json to install a new module, that’s incorrect, you’ll have to run composer update too. These things are small, but details matter, especially to beginners

You’ll find a few more situations, but after all I like the book and don’t want to give you an impression that’s worse than I think it should be.

The good parts

I like the started, the introduction about FuelPHP. I often ask myself: Do we really need this? Whether it is a PHP framework, a new Linux desktop. You’ll get a good feeling about what FuelPHP is about.

The demo application is perfect, it shows you how to create models in no time, how to run migration scripts to manage the creation but also the change of the database structure. It quickly covers the controller part, a few words about models and their relationships and bit about the output. You’ll also learn how to create a module and a package, their difference is well explained but will change in v2.0 as far as I know.

Should I read this book?

It depends on your background – I wouldn’t recommend it if you’re a PHP programmer who hasn’t worked with namespaces, databases before. But please keep in mind that this is a short book of only about 80 pages content. FuelPHP might have deserved a bit more but the shortness was nice – at least for someone like me who has worked with all kinds of frameworks. I’d definitely recommend to book if you worked with other frameworks like CodeIgniter, Yii, Zend .. before and now want to have a look at FuelPHP. You’ll get a good impression about its possibilities!

concrete5 – searching and cloning pages

In this short tutorial I’ll show you two different things. We’ll start with a simple example that explains one function of the PageList class and then another method you can use to duplicate a page.

Searching for pages by an attribute with PageList

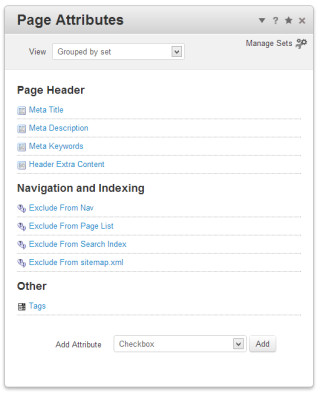
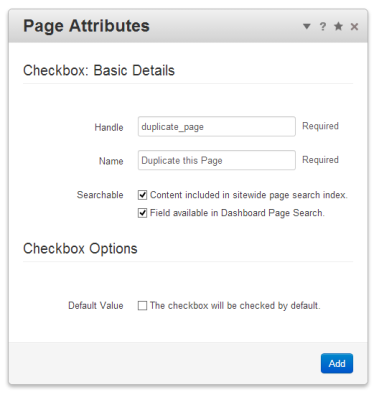
The PageList class is very powerful, especially in combination with attributes. In order to be able to search after an attribute, we’ll create a new attribute called “Duplicate this Page”. We’ll use it to mark pages we’d like to clone. First, open the attributes page (/index.php/dashboard/pages/attributes/) and select the checkbox type like shown here:

page_attr

Click on the “Add” button and create the attribute using these values:

page_attr_detail

Now go back to the sitemap and pick a few random pages and assign the new attribute to them and tick the checkbox. Let’s have a quick look at some code. We’ll create a new file called “test.php” in the “tools” directory.

1
2
3
4
5
6
7
8
9
10
// build PageList object to get all pages where the attribute
// with the handle "duplicate_page" is checked
$pl = new PageList();
$pl->filterByDuplicatePage(true);
 
$pages = $pl->get(0);
 
foreach ($pages as $page) {
    echo $page->getCollectionName() . '<br/>';
}

When you now open /index.php/tools/test/ you’ll get the names of all pages where you’ve assigned our new attribute.

The PageList class has a magic method with which you can search for attribute values in an elegant way. Simple append the handle in CamelCase notation after “filterBy”. Your attribute handle is “very_lovely_day”, use $pl->filterByVeryLovelyDay(…); This works not only with checkbox attributes but with almost all attributes you can find.

Cloning pages

Assuming we’d want to copy those pages to a new location, we could easily use the “duplicate” method. But first, create a new page in the sitemap underneath you want the cloned pages to appear. Mine is called “Target Container” and hass the path “/target-container”. We use this in combination with the script we wrote above to get the final result:

1
2
3
4
5
6
7
8
9
10
11
12
13
14
15
16
17
18
<?php
 
// get target container underneath which we'll create the cloned pages
$targetPage = Page::getByPath('/target-container/');
 
// build PageList object to get all pages where the attribute
// with the handle "duplicate_page" is checked
$pl = new PageList();
$pl->filterByDuplicatePage(true);
 
// return _ALL_ pages we've found. If you have hundreds of pages
// you might want to use $pl->getPage(); and run the script several
// times
$pages = $pl->get(0);
 
foreach ($pages as $page) {
    $page->duplicate($targetPage);
}

When you open /index.php/tools/test again, you’ll get some clones in no time! But be aware, if you run the script again, you’ll get more clones.


concrete5 class loader

If if worked with concrete5 before, you’ll probably have seen lots of Loader::model or Loader::helper. A few versions ago these calls were pretty hard to avoid and you had to use them rather often. The core still doesn’t have namespaces due to the fact that the development of concrete5 has started when PHP didn’t know anything about namespaces. The class loader does help a lot though, even if there are no namespaces.

Here’s a simple example showing you how to load classes automatically.

All classes you want to load have to specified in an array in your package controller:

$classes = array(
    'TestClass' => array('model', 'test_class', $this->pkgHandle),
);
Loader::registerAutoload($classes);

Complete file: https://github.com/Remo/codeblog/blob/master/codeblog_classloader/controller.php

If you want to load a helper, replace the first parameter “model” with “helper”. The second parameter is the file name but without the file extension and the last parameter is the handle of the package where our class is located. Once we’ve specified the class names, we can pass it on to Loader::registerAutoload and are almost finished.

When you now want to use our “TestClass”, you can simply use this code:

echo TestClass::saySomething();

Complete code: https://github.com/Remo/codeblog/blob/master/codeblog_classloader/tools/test.php

You can find a working package here https://github.com/Remo/codeblog/tree/master/codeblog_classloader
Once you’ve installed it, you can call the tools file to test everything by opening “/index.php/tools/packages/classloader/test”, e.g. http://localhost/index.php/tools/packages/classloader/test


concrete5 – package installer based on XML file

If you ever built a concrete5 package before, you’ll probably have had to write some code to handle the installation process where you check if an object is already installed and if not, add it. Especially with packages that are in use, this can take a while and the code gets messy very quickly. However, there’s an alternative which is not yet well known.

Creating installation XML

Before we start looking at some code, how do we get our XML content? There are a ton of different objects, but luckily, we can generate an XML from an existing site very easily. To do that, you’ll have to install the Sampel Content Generator you can find here http://www.concrete5.org/marketplace/addons/sample-content-generator/. Please note that you currently have to install it manually as it’s marked as incompatible with version 5.6.

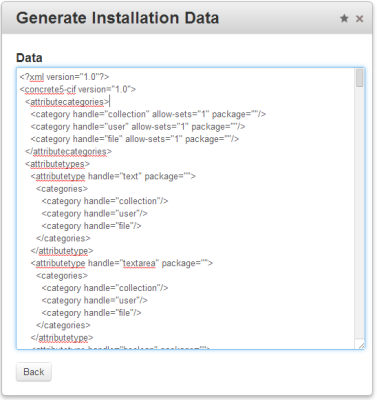
Once you’ve installed the add-on, you can find a new single page in your dashboard. If you open it, you’ll find two buttons, the first one “Archive Files” to create a complete zip file of the site and the second one “Generate content.xml from current website” to get the output we’re looking for. If you click on the second button, you’ll see a screen like this:

installation-data

The output you can see in this screen contains everything you’ve got in your site. That’s way too much for a package but it’s pretty easy to find the elements you need. Most elements are pretty self-explanatory. In my example, I’ve needed two elements, one I had to add using a previous version of my package controller (attributetypes) and one I’ve added in the dashboard (attributetypes). The complete content of my XML looks like this:

1
2
3
4
5
6
7
8
9
10
11
12
13
<?xml version="1.0"?>
<concrete5-cif version="1.0">    
    <attributetypes>
        <attributetype handle="remo_phasher" package="remo_phasher">
            <categories>
                <category handle="file"/>
            </categories>
        </attributetype>
    </attributetypes>    
    <attributekeys>
        <attributekey handle="image_hash" name="Image Hash" package="" searchable="1" indexed="1" type="remo_phasher" category="file"/>
    </attributekeys>
</concrete5-cif>

I’ll put this content in a file called install.xml right in the root of the package. It looks like this:

file-structure

Install XML content from package controller

In our package controller, all we need is this:

1
2
3
4
5
6
7
8
9
10
11
12
13
14
15
16
17
18
19
20
21
22
23
24
25
26
27
28
29
30
31
32
33
<?php
 
defined('C5_EXECUTE') or die('Access Denied.');
 
class RemoPhasherPackage extends Package {
 
    protected $pkgHandle = 'remo_phasher';
    protected $appVersionRequired = '5.6.2.1';
    protected $pkgVersion = '0.9';
 
    public function getPackageDescription() {
        return t("Adds perceptual hash to images.");
    }
 
    public function getPackageName() {
        return t("Image pHasher");
    }
 
    public function install() {
        $pkg = parent::install();
 
        $ci = new ContentImporter();
        $ci->importContentFile($pkg->getPackagePath() . '/install.xml');
    }
 
    public function upgrade() {
        $pkg = Package::getByHandle($this->pkgHandle);
        $ci = new ContentImporter();
        $ci->importContentFile($pkg->getPackagePath() . '/install.xml');
 
        parent::upgrade();
    }
}

We simply get an instance of ContentImporter and import the content of our XML file in both methods, install as well as upgrade. If you need a new item, just add it to install.xml and you’re good to go. You can find a complete example on github: https://github.com/Remo/concrete5-phasher.


concrete5 – programmatically creating a page alias

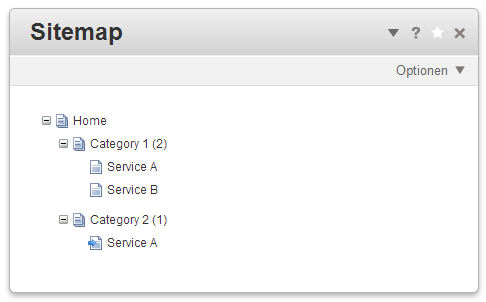
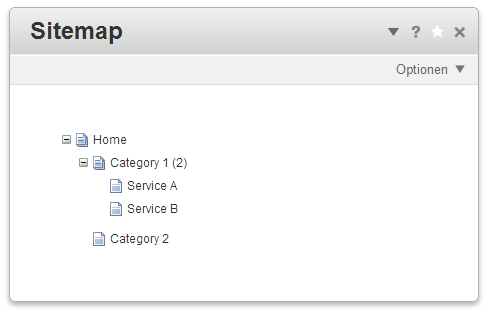
in concrete5 you can create an alias if you want a page to appear at two different locations. If you look at the following site structure, you can see that we have two categories and two different services we’d like to offer.

alias_1

For whatever reason, we’d like to make sure that our main service shows up beneath both categories. It’s physical location is right under the first category but how do we add an alias underneath the second category? In the UI this is super easy, just drag the service to the second category and release the mouse button – a dialog will show up where you can select that you want to create an alias and that’s it! But how do we the same using code? It’s also pretty simple:

1
2
3
4
<?php
$pageToAlias = Page::getByPath('/category-1/service');
$parentOfAlias = Page::getByPath('/category-2');
$newAlias = $pageToAlias->addCollectionAlias($parentOfAlias);

I’ve used Page::getByPath to get both page objects but you can of course use Page::getByID or anything else that returns a valid page object. As soon as you’ve run this code, you’ll have an alias in your sitemap like that:

alias_2


concrete5 – smart attribute/picture fetching through page hierarchy

In this article I’m going to explain a nice code that works with attribute. It’s something quite a few people are using but it never crossed my mind to write something about it until my friends from 100pro asked for it.

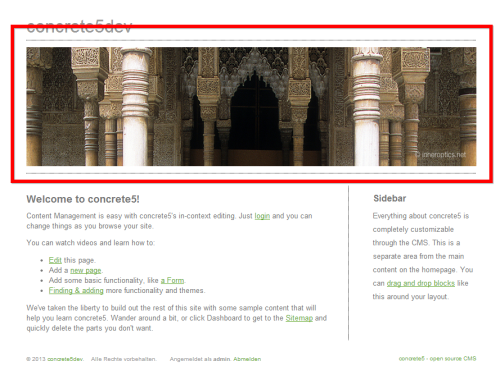
Let’s start with a quick look at the problem we’re going to solve. Our page layout is pretty simple, two columns, some content and in our case the most important part: A picture in the head of every page:

attribute_recursion_header_pic

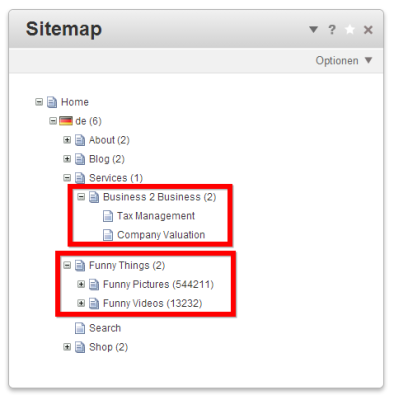
Assuming we’ve got the following structure in our sitemap:

attribute_recursion_sitemap

As you can see, this company has two slightly different offers on their site. Due to that, the boss wants to have different pictures that match the two topics. Easy, you might say, just add a block in the header of each page – until you notice that there are quite a few pictures & videos and thus lots of pages. Still easy you might say, why not create two page types and use the page type defaults to manage these pictures? Well, you could do that but using a page type for that feels wrong and sometimes it’s not that clear that you need two different pictures.

Silly story short: We want to specify a picture for “Business 2 Business” which is used on that page as well as all its children and we also want to specify a picture for “Funny Things” and its children.

Use an attribute from parent pages

We’re going to use an attribute to assign a picture to these two pages. If you’re logged in, open this page on your site: /dashboard/pages/attributes/. At the bottom, select “Image/File” and hit “Add”. Enter “header_pic” for handle and “Header Picture” for name.

Next, go back to the sitemap /dashboard/sitemap/full/ and click on “Business 2 Business” and then “Properties”. If you switch to “Custom Attributes” and scroll to the bottom, you’ll find our new attribute. Click on it and select a picture of your choice. Save everything and do the same for the second page “Funny Things”. Now that we’ve assigned the two pictures to our pages, it’s time to do the coding.

Fetch attribute from parent pages

This step might look slightly different depending on your theme but should be farily easy to adapt with a basic understand of HTML. The header area you want to replace with the picture selected in the attribute is mostly likely found in elements/header.php of your theme. In my case, the part we have to modify looks like this:

1
2
3
4
5
6
7
8
9
10
<div id="header-area">
   <div class="divider"></div>
   <div id="header-area-inside">
   <?php 			
   $ah = new Area('Header');
   $ah->display($c);			
   ?>	
   </div>				
   <div class="divider"></div>
</div>

Looks have a look at the comment code that replaces the code above:

1
2
3
4
5
6
7
8
9
10
11
12
13
14
15
16
17
18
19
20
21
22
23
24
25
26
27
28
29
30
31
32
33
34
35
36
37
<div id="header-area">
    <div class="divider"></div>
    <div id="header-area-inside">
        <?php
        $nh = Loader::helper('navigation');
        $ih = Loader::helper('image');
 
        $c = Page::getCurrentPage();
 
        // get list parent pages of current page
        $collectionTrail = $nh->getTrailToCollection($c);
 
        // add current page to array
        array_unshift($collectionTrail, $c);
 
        // loop through all the pages back to the home page
        foreach ($collectionTrail as $page) {
            // get attribute from page
            $picture = $page->getAttribute('header_pic');
 
            // check if attribute on page exists
            if ($picture instanceof File) {
                // make sure the picture isn't bigger than 800x300, cameras
                // these days take huge pictures
                $thumbnail = $ih->getThumbnail($picture, 800, 300, true);
 
                // print thumbnail
                echo "<img src=\"{$thumbnail->src}\" alt=\"\"/>";
 
                // stop searching through more pages
                break;
            }
        }
        ?>	
    </div>				
    <div class="divider"></div>
</div>

This code uses the navigation helper to get a list of all the parent pages and then loops through all of them until a page is found where the attribute with the handle “header_pic” has a valid file. In this case, we replaced the existing area but you can of course also keep it and add the code shown above as an extension.

The method “getTrailToCollection” is usually used to build a breadcrumb like navigation. There’s an autonav template called “breadcrumb” that does that as well but if you wonder how to create a breadcrumb navigation with code, here’s an example:

1
2
3
4
5
6
$nh = Loader::helper('navigation');
$c = Page::getCurrentPage();
$collectionTrail = array_reverse($nh->getTrailToCollection($c));
foreach ($collectionTrail as $page) {
    echo "<a href=\"{$nh->getLinkToCollection($page)}\">{$page->getCollectionName()}</a> ";
}

I hope you were able to get nice pictures with little effort into your site! If not, post a comment and I’ll do my best to get it fixed!


My answer to the most difficult Sudoku

A coder likes riddles like coding. Unlike my post about the number of zeros at the end of the result of 1000! this post does not even have any code in it. I found a post about a sudoku which is supposed to be the most difficult of its kind, check this link for more information: http://www.chinaabout.net/69-year-old-chinese-farmer-answer-difficult-sudoku-world/.

There’s one solution in the article, the second one is missing. Suspicious how I am, I had to check if there’s a second solution. It turns out there is, here’s my solution:

8 1 2 | 7 5 3 | 6 4 9
9 4 3 | 6 8 2 | 1 7 5
6 7 5 | 4 9 1 | 2 8 3
------+-------+------
1 5 4 | 2 3 7 | 8 9 6
3 6 9 | 8 4 5 | 7 2 1
2 8 7 | 1 6 9 | 5 3 4
------+-------+------
5 2 1 | 9 7 4 | 3 6 8
4 3 8 | 5 2 6 | 9 1 7
7 9 6 | 3 1 8 | 4 5 2

What I don’t understand is how one knows whether it’s the most difficult sudoku. Anyone knows more than I do?


Getting started with Google App Engine for PHP and concrete5

You might have read or heard that Google added PHP as a supported language to their cloud hosting platform App Engine. The official documentation is available here and gives you a lot of information to get started:
https://developers.google.com/appengine/docs/php/gettingstarted/.

If you’re a returning visitors to this blog, you’ll probably have noticed that I often work with a CMS called concrete5. It’s a neat CMS to work with for end users but also very powerful to extend for developers.

No surprise, I wanted to see if I could get concrete5 running on GAE for PHP. The documentation has clear instructions that help you to get a test environment ready on your local computer. You’ll need to install Python, PHP as well as the Google App Engine SDK for PHP, more about that here: https://developers.google.com/appengine/docs/php/gettingstarted/installing.

The Hello world tutorial explains almost everything you need to know to get concrete5 running, I’d recommend that you follow it too, it only takes you a few minutes to install everything and get the famous “hello world” output on your screen https://developers.google.com/appengine/docs/php/gettingstarted/helloworld. As you can see in this tutorial, Google doesn’t use a htaccess file but rather a file called app.yaml. This is where you specify your applications settings as well as redirect rules. The most important part is this:

- url: /.*
  script: index.php

This will tell App Engine to redirect all requests to index.php which is exactly what concrete5 does too, but normally using this:

RewriteRule . index.php [L]

However, there’s one more thing we have to take care of, there are static files that won’t be served correctly at the moment. Let’s have a look at the original .htaccess file first:

<IfModule mod_rewrite.c>
RewriteEngine On
RewriteBase /
RewriteCond %{REQUEST_FILENAME} !-f
RewriteCond %{REQUEST_FILENAME}/index.html !-f
RewriteCond %{REQUEST_FILENAME}/index.php !-f
RewriteRule . index.php [L]
</IfModule>

Let’s just focus on the first RewriteCond, this will make sure that the RewriteRule statement is only executed if the requested file doesn’t exist. If /concrete/themes/default/main.css is requested, Apache will know that it exists as a real file and stops the rewrites process, but if /about is requested, Apache will forward that request to index.php. I couldn’t find the exact same functionality but with an additional handler, I was able to see resources like the pictures just fine. Here’s the complete content of app.yaml:

application: concrete5
version: 1
runtime: php
api_version: 1

handlers:
- url: /(.*\.(ico$|jpg$|png$|gif$|css$|js$))
  static_files: \1
  application_readable: true
- url: /.*
  script: index.php

When working on your local computer, you can easily use your existing MySQL installation but if you want to deploy your application to the cloud, things work a bit different. Unfortunately I wasn’t aware of that, I thought that if I only use very little resources, App Engine would be free. From what I can tell, you can run a PHP application for free but as soon as you want to store something in a database, you have to pay. There are two different options, first Google Cloud Storage which is a simple database without a lot of functionality, if you want to port an existing SQL based application, you might want to look at Google Cloud SQL which is a MySQL database running in the cloud. More about that here https://cloud.google.com/products/cloud-sql. Here are a few technical things that you might want to check out https://developers.google.com/appengine/docs/php/cloud-sql/developers-guide.

Since I wanted to move my concrete5 site concrete5.ch to Google App Engine, the fact that storage isn’t free, is a killer argument at the moment. I’d very much like to finish the experiment but I’ll wait till I have a project where I actually make some money before I spend money.

However, I’m pretty confident that I could get concrete5 running on App Engine.


Maximum Length of a website address / URL

Short story about maximum URL length

Make sure your URLs aren’t longer than 2’000 characters

Long Story about the maximum URL length

As a web developer you’ve probably seen a GET method request a few times. If you have a form and submit it, all the parameters including their values are appended to the browser URL. The more parameters you have to longer the address gets. You can use a POST method if you want to transfer more data but a GET request has the benefit of being link-able – you can copy the whole address and send it to anyone.

While you might want to avoid that in certain cases due to aesthetic reasons, there’s also a technical limit.

The standard RFC2616 specified that your URL should not exceed 255 bytes, check 3.2.1 in this document: http://www.faqs.org/rfcs/rfc2616.html.

It turns out that you can use up to 2’000 characters and it also turns out that someone had a closer look. Check this page more information http://www.boutell.com/newfaq/misc/urllength.html


How many trailing Zeros does the result of 1000! have? Brute-force solution with Google Go

A lot of tech companies ask interesting questions when they hire employees. One of these questions is: How many trailing zeros are there in 1000! (1 × 2 × 3 × .. × 1000).
As you might imagine, the actual result of 1000! is a rather large number, something you can hardly do in your mind, at least unless you’re some kind of savant.

However, there’s a solution you can come up with that doesn’t need a calculator or anything digital. Spoiler alert: There are certain multiplies that give you a zero at the end. Google knows the answer if you’re wondering how to solve this riddle with a paper and a pen.

I’ve been playing around with Google’s language “Go” for a while and wondered if I could solve this riddle using a more brute-force like solution. The code is rather simple, there’s a factorial function I needed to add because the result is too big for a data type like double or int. I then call that function and count the number of zeros using a simple regex pattern. Something you can do when you’re in an interview but it works as well and is also pretty fast.

package main
 
import "fmt"
import "math/big"
import "regexp"
 
func main() {
	c := int64(1000)
	f := big.NewInt(c)
	s := factorial(f)
	r := regexp.MustCompile(`[0]+$`)
 
	l := r.FindString(s.String())   
	fmt.Printf("There are %d zeros at the end of %d!\n", len(l), c);
}
 
func factorial(n *big.Int) (result *big.Int) {
	result = new(big.Int)
 
	switch n.Cmp(&big.Int{}) {
	case -1, 0:
		result.SetInt64(1)
	default:
		result.Set(n)
		var one big.Int
		one.SetInt64(1)
		result.Mul(result, factorial(n.Sub(n, &one)))
	}
	return
}